
This may not seem quite seasonal. A post on a winter comfort food such as Spaghetti Sauce. But anyone who gardens or is into canning knows that this time of year, the peppers and tomatoes are hanging on the plants, and ready to be harvested. I have made salsa every year in huge quantities (100 x 1L mason jar batches is the annual norm), and once in a while I’ve been know to make a batch or two of canned tomato sauce or seasoned stewed tomatoes. And then, there’s the peaches, and the jams, and pickles. Mmmm, Pickles…
Tomatoes, Onions, Peppers = Spaghetti Sauce
But, I digress. This afternoon, I noticed that I had some tomatoes ready – too many to have sit on the counter and wait for the fruit flies to collect while my husband uses a slice or two at a time for sandwiches, but too few to start the annual “get the kids to start processing the tomatoes for salsa” fun. I didn’t want them to be wasted, so I took the time (see previous post on time if you want a chuckle at how my mind works) to make some “absolutely from scratch, using produce from my very own garden, delicious spaghetti sauce”.
Started with peppers, and onions. Ok, the red onion wasn’t from my garden. It doesn’t drain well enough for onions. Every time I try, they just end up way too small and end up going all soggy a few weeks into August. Didn’t even try this year.


But the green peppers are from my garden.
Someone gave me some lovely bulbs of garlic, so I was blessed to be able to add some of those, as well. And I did the “smash, then chop” method I explained in an earlier blog. This fall, I’m going to try my hand at garlic growing.


So, I sautéd those in butter, of course. Added the crushed, then chopped garlic when the onions and peppers were already soft, so that they wouldn’t get too done.
Don’t forget the Tomatoes
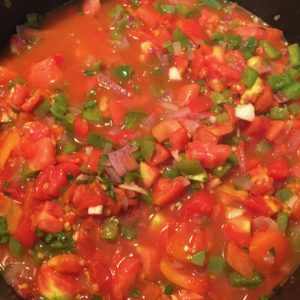
And then, some tomatoes. I had about 12 of them, so I used them all. Greg will just have to pick another one tomorrow for his sandwich. I blanched them for 30 seconds to make the skins peel off easily and chopped them up pretty small. For good measure, I also crushed them, but you might want to run your through a food processor if you don’t like chunks. I, however, love chunks. :) Added those to the sautéd veggies.

And finally some basil. Best decision I ever made, growing basil this year. I made this decision mainly because I wrote a blog on making Pesto from scratch, which led me to realize that buying fresh basil is too expensive. I used two full branches, snipped off just the leaves and chopped them really fine, and added them to the mix.

Not too much sugar!
Seasoned with salt and pepper, and just a little bit of brown sugar. And I really mean a little bit. About a tablespoon for the whole batch. You only want to add enough to take the sharpness out of the tomatoes. Too much more, and you might as well buy sauce at the store for all the flavour it will delete from your sauce.

Then, the time part. I simmered my sauce from about 4:00 to 6:00 after bringing it all to a boil. I stirred it occasionally, of course, but for the most part, just ignored it. Umm, “ignore” is not a great description, actually. After about 10 minutes, the aroma coming from the sauce pretty much took over the upstairs. And then the downstairs. I had kids coming up almost an hour before usual dinner time, wondering when we were going to eat.
And, one more thing for the texture-picky children I own. I had to run a couple ladles of the sauce through my Braun, to eliminate all those wonderful chunks before serving it up at the table.
(insert under the breath muttering at this time)
And Greg said he would have liked it “saucier”, which could have been obtained by adding a can of Tomato paste, but that kinda defeated the “homemade” part of the blog and recipe, so I didn’t.
(the recipe can be found here)
And, of course, since this is a recipe for a meat market, and a meal for a meat market family, I added some ground beef to the sauce. You could add chicken if you wanted, of course, but in our home, ground beef is the usual for spaghetti.
Little tip on cooking up Greg’s Ground Beef.
It’s lean. I mean, really lean.
It’s kinda like what other stores call Extra Lean.
But it’s our Regular Ground.
If you ask for Extra Lean, you might get a funny look, ’cause that’s just silly when you see how lean our Regular is.
This means, that if you fry it up like other ground beef, it might dry out.
Not a good thing. Really.
So, with Schinkels’ Ground Beef, please remember to cook it on a low to medium heat,
and my extra special trick – use a lid.
Especially if you are starting with frozen.
Just set in in the pan, on a low to medium heat, and as it cooks, break it apart, but keep the lid on in between stirs. This way, you will retain all the juices, and before you think the juice is “fat”, think again. Take a look at this:

closer:

see that? While you may see some liquid, just the few little “bubbles” are fat, and there’s not much there. Juice is good, and fat is flavour. Those are words to cook by in my kitchen.